
The rest of this series can be found here.
Today, I start adding due dates to the to-do items. I’m still enjoyably surprised by how easy it is to add more fields and the corresponding logic to a Ruby on Rails app.
Adding the duedate column
It was easy enough to add another column to the database: $ rails generate migration AddDueDateToTodos duedate:datetime and then $ rake db:migrate
- However…I didn’t realize at first that the migration name should have the format
AddXXXToYYY, and so was puzzled why the migration file didn’t have my new column in it. - I copied and pasted the
add_columndeclaration from a previous migration, changed what I needed to, and it worked.
Adding logic for handling the duedate
Again, it was easy to add the data field and placeholders, though I ran into two issues pretty quickly:
- The due date wasn’t saving;
- When editing items, they seemed to be toggling back and forth between completed and not completed.
Fixing the “completed” logic
First, I tried to fix the issue of the duedate not being saved. I added render plain: params[:todo].inspect into the def complete controller block, but it didn’t do anything.
Eventually I realized that I’d forgotten to add it as a permitted parameter; that fixed that issue.
Somewhere along the way, though, I realized that the complete controller was handling all the updates, so commented it out and immediately ran into more errors. Turns out the new patch 'todos/:id', to: 'todos#complete' route was handling all the updates, and it was testing whether the completed was set to true or false and toggling it, because that’s the behavior I needed for the one-click completion.
After a bit of research, I figured out that for the one-click completion, I needed a named route; this did the trick: get 'todos/:id/complete' => 'todos#complete', as: :completed.
Then I got to thinking “Why test if the todo is completed or not? Why not instead add another route for ‘uncomplete’?” This makes more sense for a couple of reasons:
- The
completeanduncompleteactions will have different endpoints, better describing what they do - In the controller logic, rather than just toggling the “completed” attribute, check to see what the route is and then complete/uncomplete based on that.
Styling the main view
At this point, I figured I may as well add some basic styling. While doing that, I decided to show the completed items in the main list as well as the remaining uncompleted items. That took just one lines of logic to add a completed or uncompleted class to the row, as well as another determining which path to use for the action links.
Here’s a screenshot of the app as it stands now: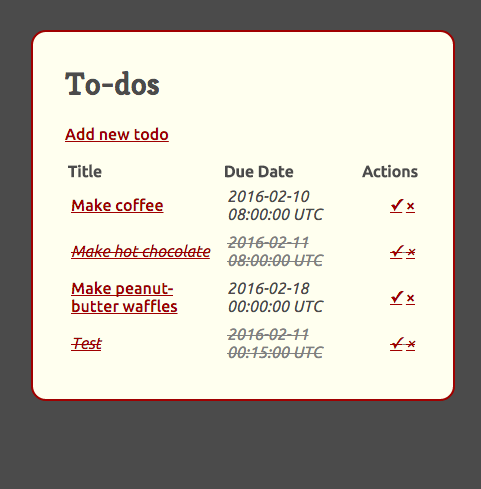
Next up: sorting the list to move the completed items to the bottom, as well as sorting the remaining items by date.
The current code can be found here.