Laravel Herd Pro MySQL and WordPress Database Connection Error

If you are using Laravel Herd Pro with a MySQL database, you may run into the “Error establishing a database connection” error.

To fix this, change your database host settings from define('DB_HOST', 'localhost'); to define('DB_HOST', '127.0.0.1'); and that should do the trick.

This can also fix errors from other software that attempts to connect using a socket (e.g., “Can’t connect to local MySQL server through socket ‘/tmp/mysql.sock’”).

Local Development and WordPress Uploads

One common issue with local development is how to handle uploaded files.

You could copy the entire wp-content/uploads/ directory but that can use up a lot of disk space for little benefit.

Another option is to rewrite all HTTP requests for missing local images to the appropriate URLs on the live site.

Here’s how to do it:

Nginx

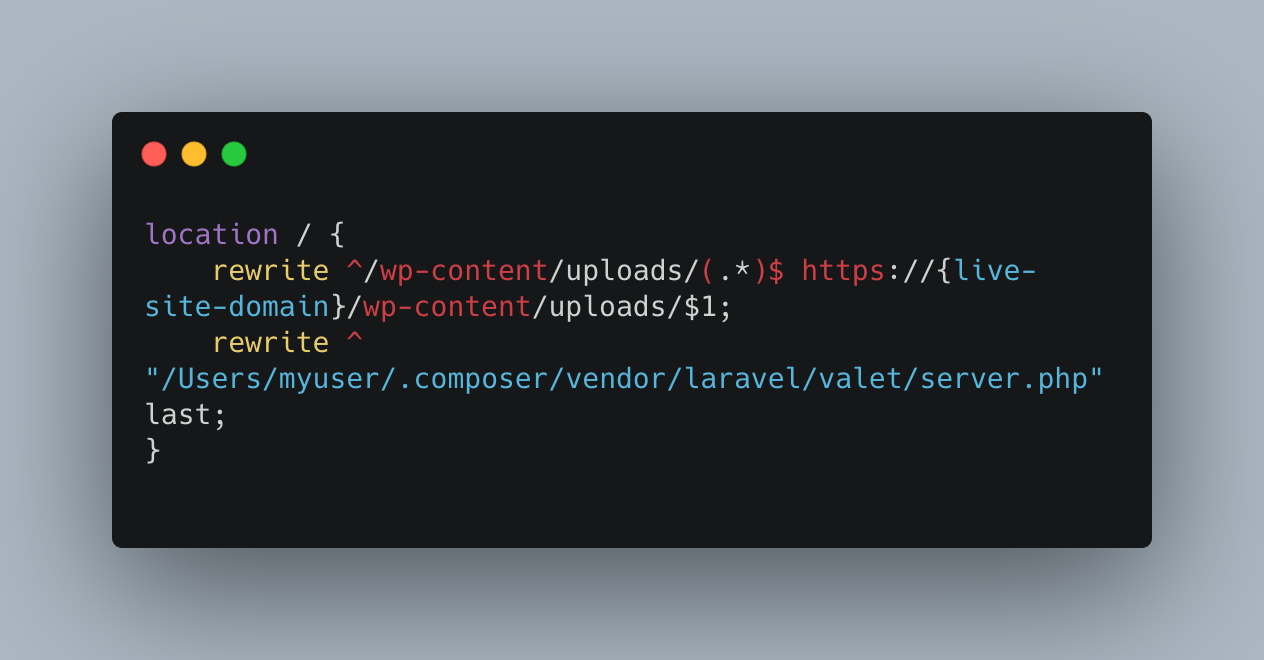
Find your nginx config file1 and add this line above the location / { block:

location /wp-content/uploads/ {
    try_files $uri $uri/;

    rewrite ^/wp-content/uploads/(.*)$ https://{live site domain}/wp-content/uploads/$1;
}

Or if for some reason you need to rewrite all files to the live site instead of just those that are missing, add this in the location / { block, ideally as the first line:

rewrite ^/wp-content/uploads/(.*)$ https://{live site domain}/wp-content/uploads/$1;

Apache

Add this line to the .htaccess file:

RewriteRule ^wp-content/uploads/(.*)$ http://{live site domain}/wp-content/uploads/$1 [NC,L]

Notes

  1. If you’re using Laravel Valet: look in ~/.config/valet/Nginx/ for a file with the same name as your site’s domain.
    If you’re using Laravel Herd: look in ~/Library/Application Support/Herd/config/valet/Nginx/ for a file with the same name as your site’s domain.

Setting Up YouTube Live

WP YouTube Live is a free WordPress plugin to display live videos on a WordPress site.

To get started, follow these instructions:

Enable Streaming on YouTube

  1. Decide if you will stream from a personal account or a brand account. Read more about the differences in this article.
  2. Decide how you will stream video.
  3. Enable streaming for your account; see this article for details.

Set up the YouTube Data API

  1. If you don’t have a Google account already, sign up here.
  2. Log in to the Google Developers Console: console.developers.google.com
  3. Create a new project if you don’t have one already.
  4. Go to the Credentials page: console.developers.google.com/apis/credentials
  5. Click the “Create Credentials” button at the top and choose “API key” and copy the new key
  6. Go to the Enabled APIs page: console.developers.google.com/apis/enabled
  7. Search for Youtube Data API v3 and enable it.

Reference: developers.google.com/youtube/v3/getting-started

Install the WordPress Plugin

  1. Go to the plugins page on the backend of your website.
  2. Press the “Add New” button and search for “WP YouTube Live.”
  3. Install and then activate the plugin.
  4. Go to Settings > YouTube, enter your channel ID and API key, and choose what to display when no video is live.
  5. Add the [youtube_live] shortcode to the page where you want the video player to appear.

Support

For other support questions, please use the WordPress support forum.

WordPress and WooCommerce at Scale with 500,000 Users

WordPress generally works fairly well on small-to-medium sites; on larger sites, it can run into performance issues because of the size of the database.

A current project I’m working on for LuminFire has a WooCommerce store with potentially 270,000+ customers, and that’s causing some issues with site performance. For sake of development, our dev store has 500,000+ users.

Contents:

Generating Dummy Users

First, I generated a CSV file with 50,000 fake users using mockaroo.com and imported them using this plugin (I had to bump up my PHP memory limit to 4096MB and execution time to 240 and it still timed out a couple of times, but I deleted the users who had already been imported and then ran the import again).

Update: I have since learned about WC Smooth Generator, and it may have worked just as well or better.

I figured 50K unique users were plenty and duplicating them via MySQL queries was more efficient, so wrote these queries to do the job.

The users queries ran in seconds each, copying a batch of 50K rows at a time. The usermeta queries, not so much…they took about 11 minutes each since there were about 1.71 million rows to clone each time.

In case it’s helpful to you, here are files with the dummy users:

  • CSV with 50K users
  • MySQL dump of wp_users table (30.4MB)
    • It does include the ID field since it needs to match the usermeta table.
    • The first user ID is 510024; if you try to import and have user IDs above 510024, you’ll have errors.
    • 500,000 rows
  • MySQL dump of wp_usermeta table (148.5MB)
    • It does not include the meta_id field (so no errors trying to overwrite existing IDs).
    • 17,000,000+ rows

WordPress User Dashboard

At the top of the user dashboard, WordPress typically displays a list of the user roles on your site, as well as the number of users in each role.

user roles

The number of each users is generated by the count_users function, which uses a resource-intensive SQL query. In our dev site, it takes 15+ seconds just to run the query.

This is a known issue and should be resolved in WordPress 5.0 (currently scheduled for release in late 2018), but we need this working much sooner.

WordPress Multisite drops the number of users per role and instead shows just a list of roles; that’s how WordPress.com and other large multisite networks avoid this performance hit.

The proposed patch on the ticket modifies the count_users function to behave similarly to WP Multisite: if there are more than 10,000 users (modifiable with the new wp_is_large_user_count filter), it doesn’t show the number of users per role.

Since the patch is for the development version of the WP code, it doesn’t apply cleanly to a production site, so I manually patched WP core. Here are several patch files for different versions of WordPress; make sure to use the appropriate patch for your version:

Core Patch File

You can apply this patch file by downloading it, opening your WordPress installation in a terminal, and running git apply <path-to-downloaded-patch-file>.

WooCommerce User Queries

The biggest performance hit I found was searching for customers when editing an order; it took 10–15 seconds for search results to be returned.
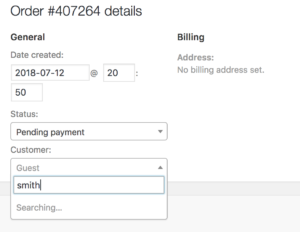
WooCommerce user search

  • If searching by customer ID, the backend would respond pretty quickly.
  • Otherwise, it runs a full text search for the search term in the first and last name, which takes a while; see the code for full details.

Since orders aren’t manually assigned/reassigned too often, we decided this behavior was acceptable for now.

WooCommerce Customer Reports

The WooCommerce customer reports were the other major performance hit. For now, we simply disabled the customers reports since this particular customer already has a third-party system where they manage the customer data, so they’re not likely to use the WooCommerce reports.

Customers vs. Guests

Timing details:

  • Around 20–40 sec to load the page
  • Around 7 sec to get administrator users
  • Around 7 sec to get shop_manager users
  • Around 6 sec to get all other users

Here are the actual actual MySQL queries. In my staging environment, PHP ran out of memory; in my local environment, it took 305MB(!) to load the report for 1 week (the default view).

As noted above, we gave up on optimizing this report since the customer doesn’t really need it.

Customers List

This was completely unusable; it took 300 seconds to load the page.

Here are the actual MySQL queries. Two JOINs times in each query with full-text search on two columns × three queries was just too much on such a large table.

As noted above, we gave up on optimizing this report since the customer doesn’t really need it.

WordPress Posts Dashboard

Update: found another place where there’s a 15+ second wait. When bulk-editing posts (or any other post type that supports authors), an author dropdown causes a full search of the wp_usermeta table. I’ve updated the patch file in the gist above to include a fix for this.

WordPress Posts Dashboard bulk edit author dropdown

Summary

In summary, having 500,000 users on a WordPress and WooCommerce site doesn’t hurt overall performance too much, as long as you include an upcoming change in WP core and can get by without the WooCommerce customer reports.

We may explore further options to improve performance particularly when getting user roles from wp_usermeta, and I will update this post or add a new post if we find other enhancements.

Menu Image Plugin + DevDmBootstrap3 Fix

This little plugin fixes the Menu Image plugin when used with the DevDmBootstrap3 theme.

Menu Image version 2.9.0 changed the way it displays images, breaking compatibility with DevDemBootstrap3. DevDmBootstrap3 uses a custom menu walker but does not use the nav_menu_item_title filter, so the plugin quit working.

One of my contract positions uses DevDmBootstrap3 for many client sites, so I wrote a basic plugin to get it working again.

Browse the code→

To use the plugin, upload the PHP file to your wp-plugins directory and activate the plugin. That’s it!

https://gist.github.com/macbookandrew/d40a416c65c615e0e15e1b6fd0645a67

Underscores Theme Multiple Menus

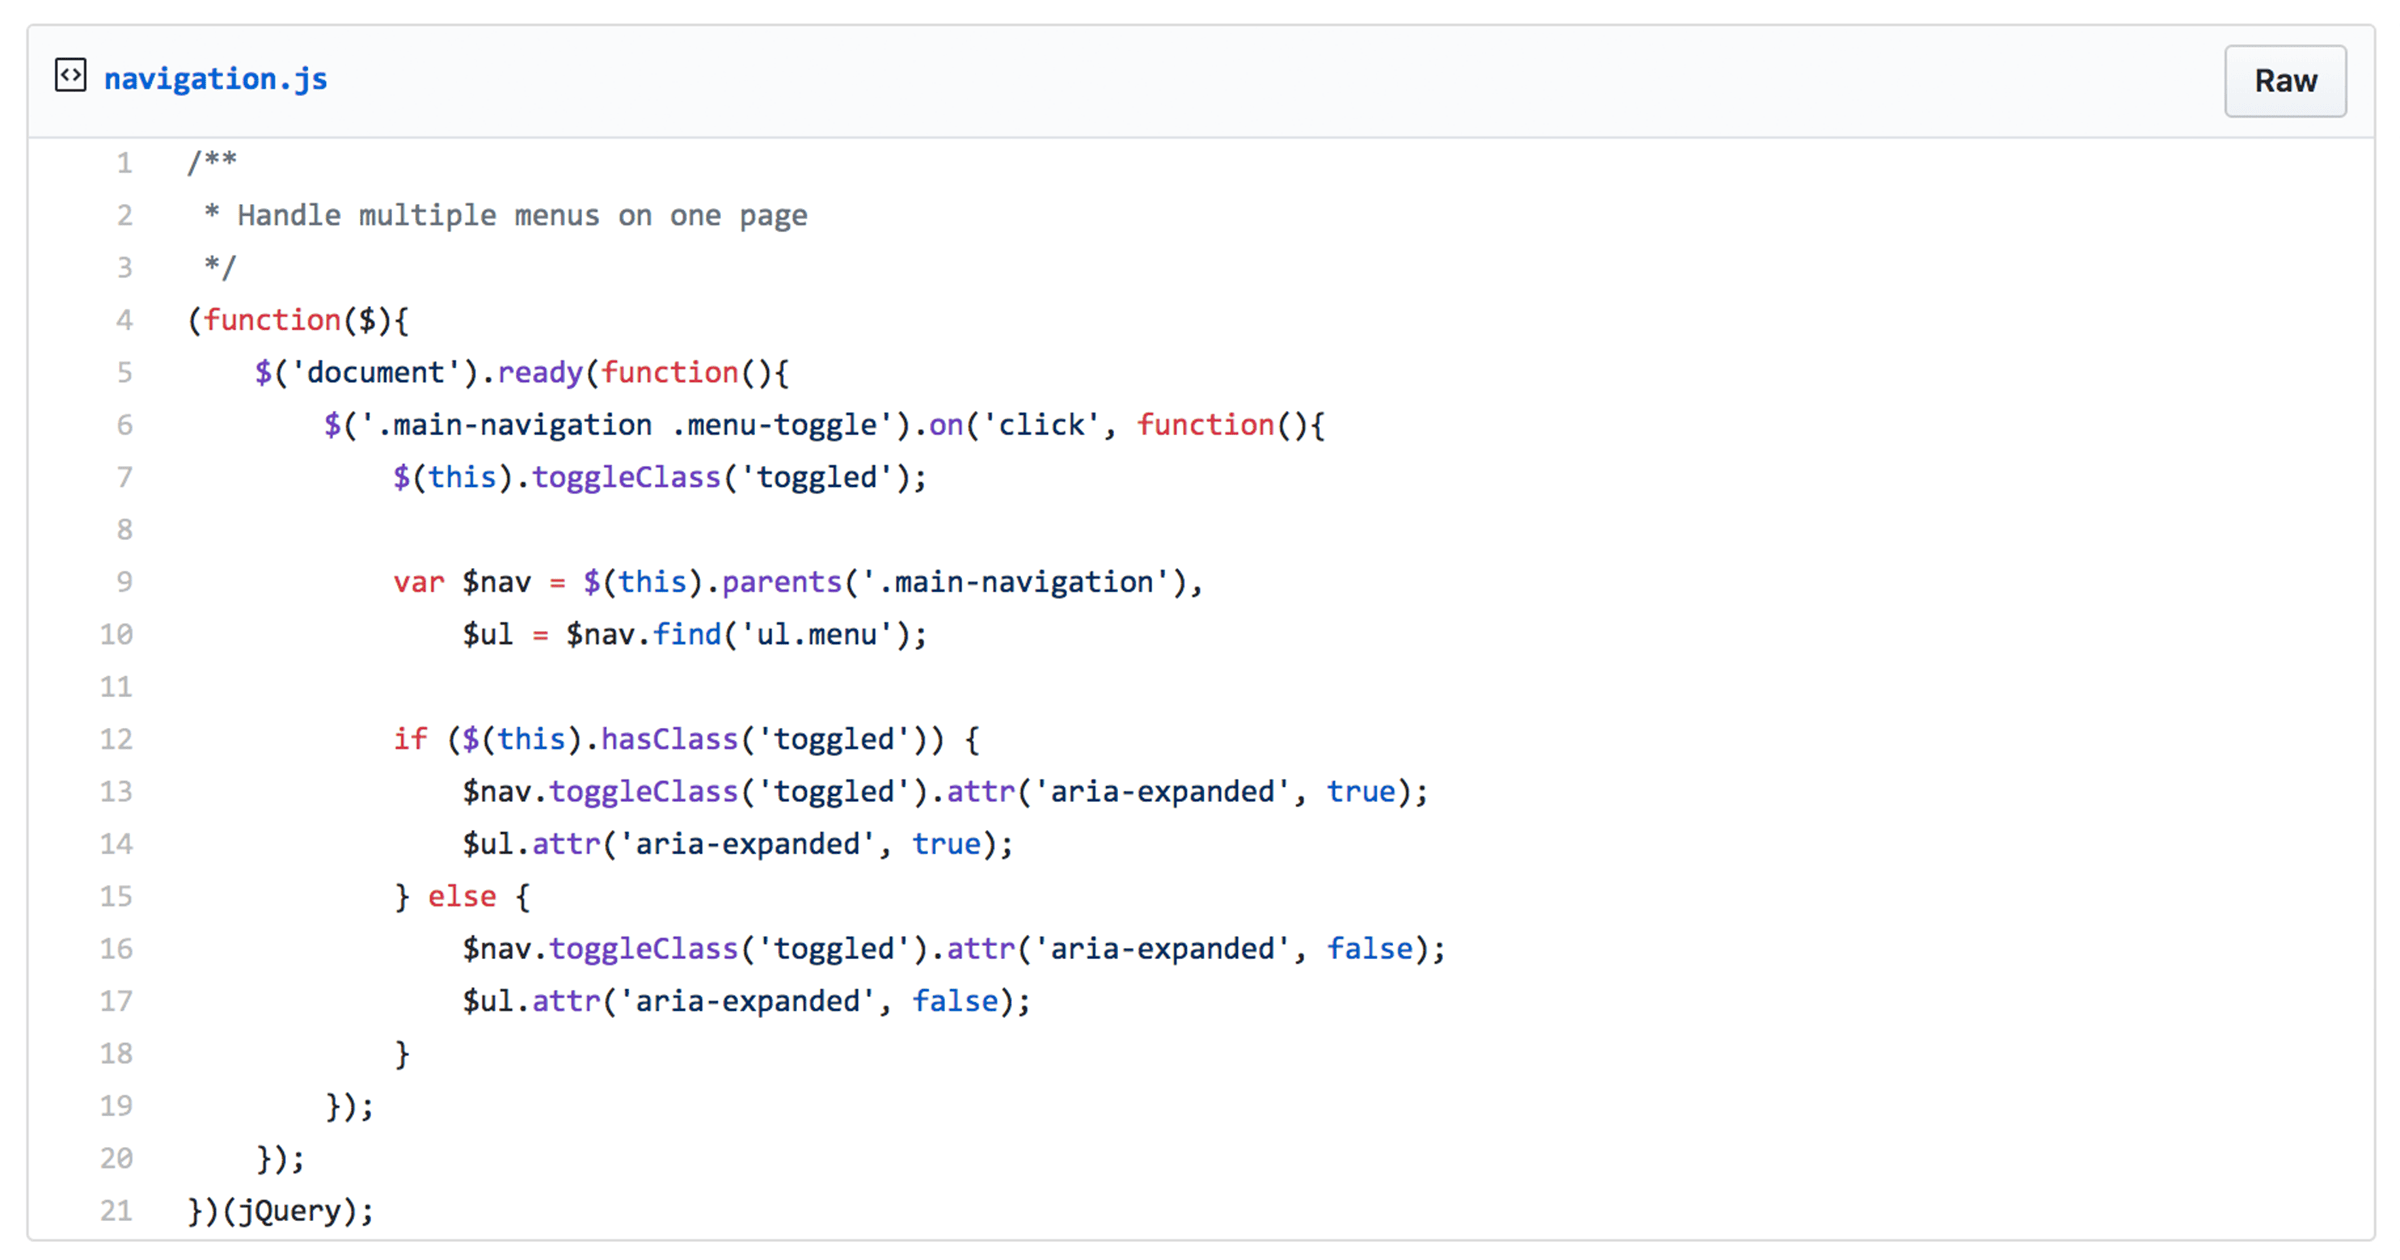
If you’re using the Underscores theme (also knows as _s) by Automattic, you may have tried to add multiple menus to the page and been frustrated when they don’t work on mobile.

Here’s a bit of Javascript to add to the theme’s navigation.js file to fix the issue:

https://gist.github.com/macbookandrew/74fd6dd1d101debcf6890778052609d4

Merge + Minify + Refresh Force Clear Caches

This plugin clears other page caches/proxies when the Merge + Minify + Refresh cache is regenerated so users don’t end up missing static resources (CSS/JS files) due to a cached page trying to load old static resources.

Get the code at the GitHub repository. Continue reading “Merge + Minify + Refresh Force Clear Caches”

Hosting WordPress inside a SilverStripe Installation

I ran into a puzzling issue today. Normally I wouldn’t recommend hosting a CMS inside another CMS installation, but for various reasons, I had to set up a WordPress blog inside an existing SilverStripe installation. For sake of this article, I’ll call it example.com/blog/.

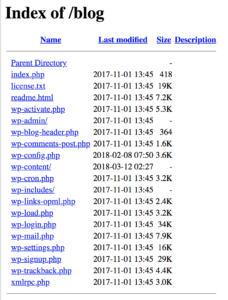
The first problem I ran into was that instead of loading WordPress, example.com/blog/ was showing the directory index:

SilverStripe WP Directory Listing

That’s obviously not ideal, as well as being a bad idea for security.

I then added Options -Indexes to the WordPress .htaccess file to disable the directory listing, but all I got was a “403 Forbidden” error when going to example.com/blog/ or example.com/blog/wp-admin/ (however, example.com/blog/?p=1 would redirect to the post URL using pretty permalinks and worked fine 🤔):

SilverStripe WP directory forbidden

I then tinkered with the SilverStripe .htaccess file, thinking it was overriding something; I added this line to make it ignore the WP blog URLs:

RewriteRule ^/blog/?.*$ /blog/index.php [L]

Still no luck.

Finally, I thought to try manually setting the index file, so added this line at the top of WP’s .htaccess file:

DirectoryIndex index.php

And that did the trick!

There must have been a server-wide setting to use some other file for DirectoryIndex (that’s the file that gets served by default when you try to access a directory URL), but I didn’t have access to the entire server.

Summary

Here’s what I ended up using:

SilverStripe .htaccess file

RewriteEngine On
RewriteBase '/'

# Added for WP blog
RewriteRule ^/blog/?.*$ /blog/index.php [L]

# Process through SilverStripe if no file with the requested name exists.
# Pass through the original path as a query parameter, and retain the existing parameters.
RewriteCond %{REQUEST_URI} ^(.*)$
### Blog Redirect ###

RewriteCond %{REQUEST_FILENAME} !-f
RewriteRule .* framework/main.php?url=%1 [QSA]

WordPress .htaccess file

DirectoryIndex index.php
Options -Indexes

WordPress Theme Stylesheet Auto-Cachebusting

If you’re like me and you set up server-side caching, CloudFlare (or any other proxy cache), and/or long Expires headers on your theme stylesheets, you know the hassles that go into invalidating those caches and forcing browsers to load an updated version.

One method to force browsers to pull the new version is to add/change the ver parameter in the query string (WordPress’ wp_register_script, wp_register_style, wp_enqueue_script, and wp_enqueue_style have a built-in way of doing this).

Query Strings

Defining a Constant

Here’s how I used to do it: define a constant and then manually update that, as well as the Version header in the style.css file.

The main drawback is that I had to manually update the version number in two places: functions.php and style.css.

File Modification Time

Another method I’ve used at times is to add the style.css file modification time as the query string.

This has the advantage that the cache will be invalidated every time the stylesheet file changes. For some reason, I really never cared for it that much, though. It does add a tiny bit of performance hit, as the filemtime has to go get the file and figure out the timestamp.

WordPress Theme Version

I just read about this today and I think it’s going to be my go-to method in the future. It uses one of WordPress’ built-in theme functions to get the version number from the stylesheet.

This has a bit of overhead as well due to the function call, but I like the fact that it uses the theme version number so you can easily do Semantic Versioning.

Filename Modification

However, most performance testing tools will recommend you remove query strings altogether to improve caching especially by proxy servers. Here are two automatic methods of doing that:

File Modification Time

WordPress Theme Version

Conclusion

No matter which method you choose, setting up caching can greatly improve your site speed. It’s worth a little bit of hassle to ensure your stylesheets and scripts are cached, knowing that with any of these methods, you can easily invalidate those assets.